Working with Vulnerabilities
Seeker provides a rich set of tools to explore and handle security vulnerabilities detected in your applications.
- From the main menu, choose
 to see all vulnerabilities.
 - From the left-side menu on the Projects page, choose Vulnerabilities to see vulnerabilities for the current project.
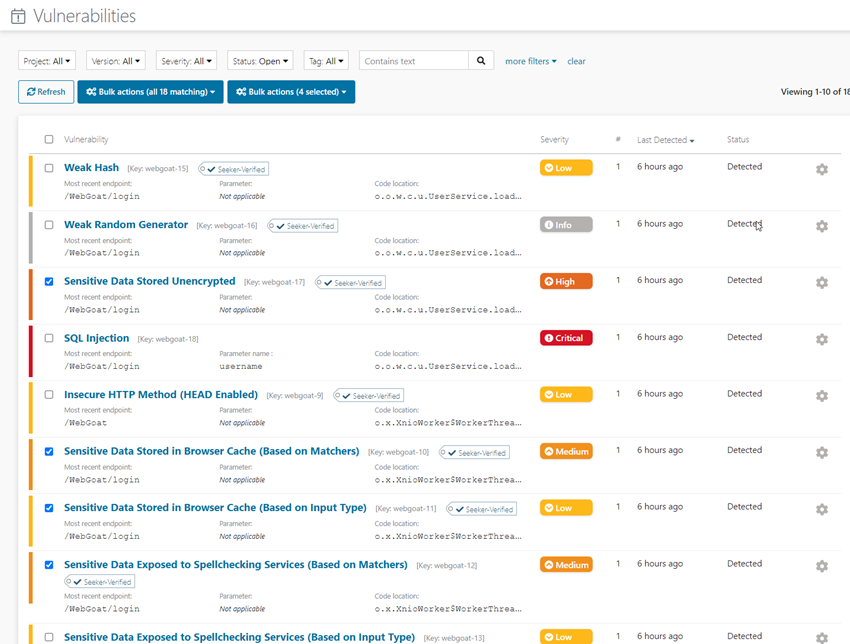
The page displays a list of detected vulnerabilities, filtered by the selections in the Filters bar at the top. Each entry displays the summary and metrics of a vulnerability, and can be expanded for further exploration and handling.

Customize the list
You can customize the list of vulnerabilities by using the following options:
- Set filters by selecting projects, versions, severity, status, tags, free text,
checkers, owners, code location, namespaces, and
more. Clear all filters by refreshing the page. Note:
- In the View box, you can select a view in which to display
vulnerabilities. This selection will apply to all this project's dashboards.
For information about views, see Configure Vulnerability Views.
-
In the Tag filter, you can define an advanced filter condition by selecting multiple system tags or predefined and/or created on the fly custom tags and combining them by the AND or OR operator. Furthermore, you can negate the whole condition by selecting the NOT operator.
For information about the system tags, see System tags.
-
Click more filters to select the Classification filter that enables you to pick individual industry standards from the lists such as PCI-DSS.
- In the View box, you can select a view in which to display
vulnerabilities. This selection will apply to all this project's dashboards.
- Sort the view by clicking any column head.
- Search for free text in the vulnerability names.
- Triage, create tickets, and apply tags to selected vulnerabilities in bulk.
Select the checkbox for each vulnerability that you want to handle in bulk, open the Bulk actions dropdown menu that appears above the table, and choose the required action.
Explore and handle vulnerabilities
Click a vulnerability name to open its page, explore the detailed information, and handle the vulnerability by performing the following actions.
- Explore a Vulnerability: Explore and analyze the detailed information, data flow, and remediation guidance, access online training.
- Triage a Vulnerability: Assign an owner and status, make and view comments, review the latest changes.
- Track a Vulnerability: Create and view tickets for handling a vulnerability in the bug-tracking system (Jira).
- Tag a Vulnerability: Apply tags to filter and manage vulnerabilities more effectively.
You can also access some of the above actions from each vulnerability's  (cog) menu. Additionally, you can create
a link from a vulnerability to an existing ticket in your bug-tracking system, or remove
this link.
Perform bulk actions for selected vulnerabilities
You can also perform the same actions in bulk for all vulnerabilities that match the current filters or for selected individual vulnerabilities in this list. To select a vulnerability, click the checkbox before its name.
- Triage
- Apply tags
- Export: CSV, JSON, XML
- Reports: PDF Report
- Create tickets
- Link to existing ticket
Export or Reports will export the currently selected vulnerabilities in one of the available formats or as a PDF report.
Prioritize vulnerability handling
A recommended practice for the handling of vulnerabilities is to sort them according to priority.
- First, address the vulnerabilities of Critical and High
severity. Set the Tags and Code Location filters in the following sequence, and handle
the filtered vulnerabilities.
- Tags: Seeker-Verified; Code location: Customer code - direct calls. These are detected with high confidence, and are easiest to fix.
- Tags: Seeker-Verified; Code location: Customer code - nested calls.
- Tags: Untagged; Code location: Customer code - nested calls.
- Consider how to address the vulnerabilities located in Third-party code. Try to obtain fixed versions of the third-party components, and if this is not possible, mitigate the vulnerabilities by adding the relevant rules to your Web Application Firewall (WAF).
- When done, repeat the above steps for the vulnerabilities of Medium and Low severity.
